Migrating TEC-X configuration files to Tesira Blocks
With the introduction of Tesira Software version 4.4.0 , a major change was done to the way TEC-X Control Pads are programmed. Previously, TEC-X Control Pads were programmed using Control Pad Designer which generated a separate JSON file for each remote to be loaded to a Server class device. In the new version, TEC-X Control Pads are programmed using a control block in the configuration file similar to how the TEC-1 or HD-1 are programmed. In order to maintain TEC-X Control Pads functionality when upgrading, the old JSON files must be migrated and new blocks need to be added to the Tesira Configuration file.
The steps described below assume neither firmware nor software have been updated yet. If the firmware was already updated either from old software or via SageVue, the process is the same just skipping the firmware update step #4.
Migration process
1. Update the Tesira Software to the most current version.
2. Connect your computer to the system to be upgraded to retrieve the configuration file from the system. If you already have the file on your PC, you can skip this step and open the file now.
3. If you connected to the system during the previous step to retrieve the file, disconnect your PC from it now.
4. Update the firmware to the current version by navigating to System > Network > Perform Device Maintenance and clicking on Update Firmware. If the firmware was already updated, you can skip this step.
5. Once the update is complete, the Server devices will display a Fault as shown below. The Fault indicates the system has TEC-X Control Pads that were configured using Control Pad Designer and that must now be updated to Blocks in order to continue working.
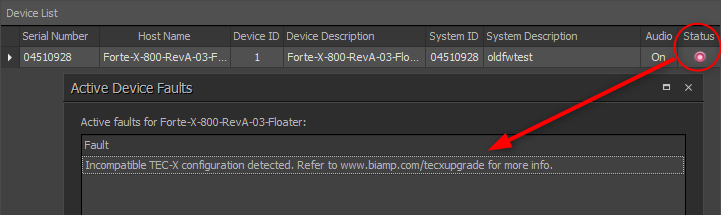
WARNING: Do not clear the configuration or reset the device as this will clear the TEC-X Control Pad JSON files!
6. Close the Device Maintenance Dialog and make sure you have the configuration file you want to update open.
7. Add a TEC-X Block to the configuration by navigating to the Control Blocks Menu, selecting TEC-X and clicking anywhere on the screen. Select the appropriate model to create a single block
8. Right click on the block and select Import JSON Configuration... 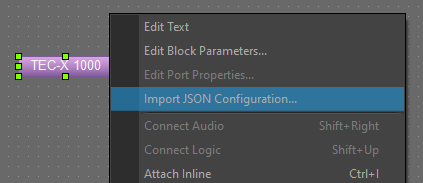
9. The dialog that appears allows retrieving JSON files from the network or a folder or file if the JSON files are stored locally. To retrieve current JSON files from the system, click Network Import. This action will search for all TEC-X Control Pad devices on the network and list them on the dialog. Each line will indicate which system the belong to. This process will also create a "TEC-XUpgrade" backup folder with all the JSON files found, grouped by system, in the default Tesira Data Files directory (usually under MyDocuments/Biamp/Tesira) in your PC.

10. Select all the TEC-X Control Pads that belong to the system and click OK. Confirm you want to proceed. This will add the necessary blocks and configure them. 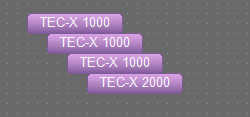
11. Send the configuration to the system. Depending on the current state of the TEC-X Control Pads, you may see them updating and restarting two or three times as they update their own firmware and load the configuration file. Also, the System Fault indicated in step #5 should clear from the system.
12. If there are more systems on the network that require to be updated, connect to each one, one at a time, to retrieve the configuration file and then follow steps 7 to 11 to migrate the TEC-X Control Pad configuration files to Tesira blocks.